

Explore Business Apps with Web Desktop App - Wisej 3
Create an application's portail with Wisej and Desktop component


Business apps can be created separately, but it can easily be disturbing when the business of an enterprise is based on several applications spread over several links and none of them inter-communicate. This is where the portal of the application's notion comes in. And even at this level, the portal should not be a simple grouping of links.
And so at the end of this post, you will be able to create a portal containing uniform applications (Micro Frontend) for your company or your ERP.
Prerequisite
Wisej 3.1, is a frontend framework created by IceTeaGroup that is based on ASP.NET Core and has similar functionality to Winform Installation.
(Optional) Wisej Extension Visual studio icons, are a library containing several visual studio icons usable with Wisej. Nuget
Wisej Dependency Injection allows to configure dependency injection with Wisej 3.1 more information here.
Winform knowledge
Implementation
To implement we will use the Wisej framework. Wisej is a frontend framework that uses .NET. The graphical interfaces are designed like those of Winforms. More information here.
Before starting this implementation, let us note that the applications created will be in the form of a library that can be integrated into a main project.
Before starting the first step of the implementation, you must have completed all the requirements.
Step 1: Solution Configuration
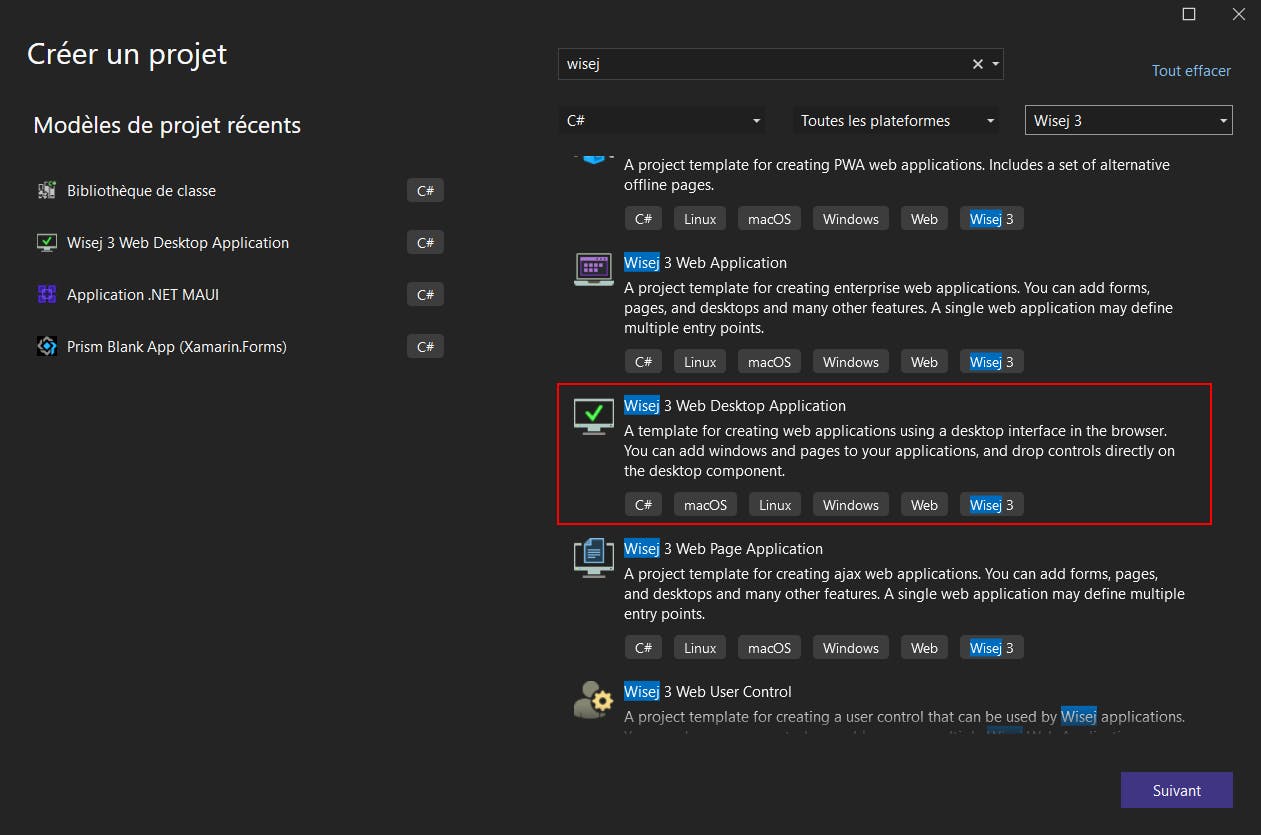
Let's start by creating a solution and a Wisej 3 Web Desktop Application project. Name respectively and BusinessApp for the solution Business.App.Portal for the project.
Create the following folders in the solution: Core, Apps and Services
The Core folder(2) contains the basic projects that all Wisej applications will have. In this folder create a library project named BusinessApp.Core.BaseApplication and install Wisej via NuGet.
The Services folder(3) contains the services that will be injected into at least two applications. In the Services folder create a library project named BusinessApp.Service.LaunchApplication
Inside the Apps(1) folder, we will have all the applications we want to create for our portal. Inside this folder create a Wisej type project named BusinessApp.Apps.Identity, install Wisej via NuGet and add the BusinessApp.Core.BaseApplication project as a project dependency. PS, This is our first application🫡.
See the .csproj file of
Business.Apps.Identityproject in the GitHub repository to better configure it.
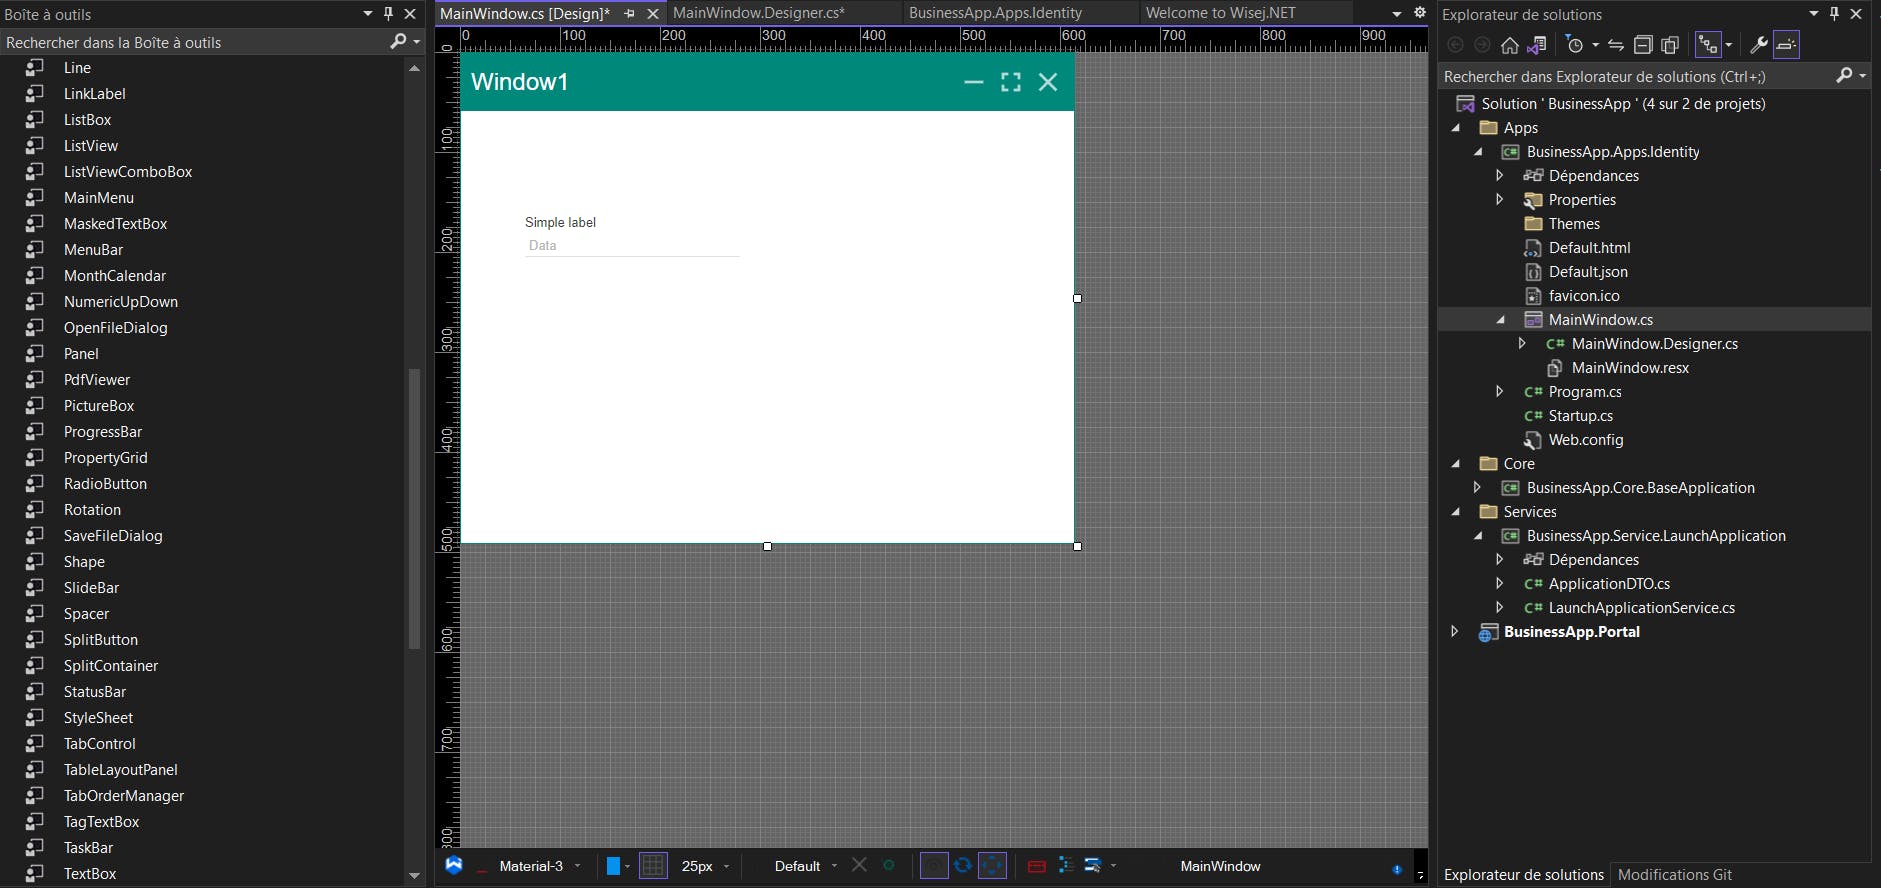
Be sure that your solution is similar to the following capture.

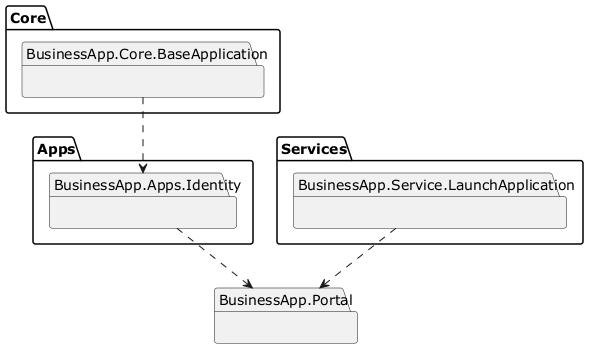
Step 2: Linking projects
Here is a package diagram representing the communication between projects.
Step 3: Create the application launcher
Before starting the implementation of step 3 let's make sure to :
Add the
BusinesApp.Core.BaseApplicationproject as a reference to theBusiness.App.PortalprojectAdd
BusinessApp.Service.LaunchApplicationproject as a reference to theBusiness.App.Portalproject.
Implementation
Start by creating a LaunchApplicationService class and the ApplicationDTO template class in the BusinessApp.Service.LaunchApplication project. This class will allow us to manage the launch of applications.
The ApplicationDTO class represents the model of all applications. It will be implemented as follows:
public class ApplicationDTO
{
    // Name of application
    public string Name { get; set; }
    // Description of application
    public string? Description { get; set; }
    // Icon of application Visual Stusio Icon for Wisej
    public string Icon { get; set; }
    // string that represent Assembly (librairy) of application
    public string AssemblyClass { get; set; }
    // Full path of first window's application
    public string WindowClass { get; set; }
}
The LaunchApplicationService is the service that serves as an application launcher, it consists of an event listener and a method to raise the said event. It will be implemented as follows:
public interface ILaunchApplicationService
{
    event EventHandler<ApplicationDTO> ApplicationLaunched;
    public void LaunchApplication(ApplicationDTO applicationDTO);
}

public class LaunchApplicationService : ILaunchApplicationService
{
    public event EventHandler<ApplicationDTO> ApplicationLaunched;

    public void LaunchApplication(ApplicationDTO applicationDTO)
            => ApplicationLaunched?.Invoke(this, applicationDTO);
}
Now that the service is implemented, we need to inject the service into the BusinessApp.Portal project.
static void Main()
{
    InitializeInjection();
    //.. rest of code
}

static void InitializeInjection()
{
    Application.Services.AddService<ILaunchApplicationService, LaunchApplicationService>(Wisej.Services.ServiceLifetime.Shared);
}
Inject the ILaunchApplicationService into the MyDesktop view of the BusinessApp.Portal project.
[Inject]
private ILaunchApplicationService LaunchApplicationService { get; set; }
public MyDesktop()
{
    InitializeComponent();
    LaunchApplicationService.ApplicationLaunched += ApplicationService_ApplicationLaunched;
}
Let's create the method ApplicationService_ApplicationLaunched is an event listener:
private void ApplicationService_ApplicationLaunched(object sender, ApplicationDTO e)
{
    // Create window instance
    var window = (Form)Activator
                    .CreateInstance(e.AssemblyClass, e.WindowClass)
                    .Unwrap();

    //You can add there Active Directoty access for authorization
    //Customize authentication like you feel
    window.Show();
}
The code above allows us to create an instance of the first window of the application and display it.
Step 4: Design the main window of the BusinessApp.Apps.Identity application
Make the design and behavior you want for your app. In our case, we will add a simple textbox.
The idea behind it is to create a micro-frontend system so we can have other applications than
BusinessApp.Apps.Identity
Step 5: List all apps
Let's build the design of the main MyDesktop view. Let's add a listview that will contain the icons of our applications.

Let's implement a service that returns a list containing the applications. In the BusinessApp.Service.LaunchApplication project, the ApplicationSerice service will be implemented as follows and then we inject the :
public interface IApplicationService
{
    IEnumerable<ApplicationDTO> GetApplications();
}
public class ApplicationService : IApplicationService
{
    public IEnumerable<ApplicationDTO> GetApplications()
    {
        //Add rôle identity for list yours applications
        var data = new List<ApplicationDTO>();
        data.Add(new ApplicationDTO()
        {
            Icon = "Wisej.Ext.VisualStudioIcons/StatusSecurityOK_cyan.svg",
            AssemblyClass = "BusinessApp.Apps.Identity",
            Description = "Simple application",
            Name = "Identity",
            WindowClass = "BusinessApp.Apps.Identity.MainWindow"
        });
        return data;
    }
}
We can display them(apps) on desktop view like this on MyDesktop.cs file (partial class), for display applications we will use the Load event of the Desktop component and ListView. More information is in the Wisej documentation.
The use of the
Tagproperty to pass the object from theApplicationDTOclass.
public MyDesktop()
{
    //... old code
    Load += MyDesktop_Load;
}

private void MyDesktop_Load(object sender, EventArgs e)
{
    // Clear ListView
    this.Items.Clear();
    foreach (var application in ApplicationService.GetApplications())
    {
        var item = new ListViewItem
        {
            Tag = application,
            Text = application.Name,
            ToolTipText = application.Description,
            StateImageSource = $"resource.wx/{application.Icon}"
        };

        // Visual Item on ListView
        this.listView1.Items.Add(item);
    }
}
Step 6: Add the double-click event to the ListViewItem
This event will help to launch the applications as if we were on a Windows desktop.

Let's implement the listView1_ItemDoubleClick event listener as follows:
private void listView1_ItemDoubleClick(object sender, ItemClickEventArgs e)
{
    var application = (ApplicationDTO)e.Item.Tag;
    if (application == null) return;

    // This will rise event LaunchApplicationService.ApplicationLaunched
    LaunchApplicationService.LaunchApplication(application);
}
We need to transform the web project BusinessApp.Apps.Identity into a library correctly. See the .csproj file in the GitHub directory.
Result
Additionals Notes
When launching the applications we used the Form class of Wisej. If you want to use the same window style for all your applications, consider using BusinessApp.Core.BaseApplication project to design a base window (BaseWindow) inheriting from the Wisej class. Once this is done, add all the features you want, and for the one you want to inherit go through virtual methods. In the end, the changes to be made will look like this:
// In BusinessApp.Core.BaseApplication projet

public class BaseWindow : Form
{

    // ... Yours functionnalities
}
// In BusinessApp.Portal projet

private void ApplicationService_ApplicationLaunched(object sender, ApplicationDTO e)
{
    // Create window instance
    var window = (BaseWindow)Activator
                    .CreateInstance(e.AssemblyClass, e.WindowClass)
                    .Unwrap();

    //You can add there Active Directoty access for authorization
    //Customize authentication like you feel
    window.Show();
}
// In BusinessApp.Apps.Identity projet

public class MainWindow : BaseWindow
{
    // your functionnalities
}
Be sure to add the BusinessApp.Core.BaseApplication project reference to BusinessApp.Apps.Identity and BusinessApp.Portal to have access to the
BaseWindowclass.
Resources
Wisej documentation docs.wisej.com
Wisej use case https://madewithwisej.com/
C# docs https://learn.microsoft.com/en-us/dotnet/standard/events
GitHub Repository https://github.com/keevBush/BusinessApp